Is your shower faucet leaking water? Your shower may drip water for the leakage of the cartridge. The replaced Moen cartridge 1225 may still leak for various reasons.
First, you need to find out the possible causes, then go for solutions.
What do you know about Moen cartridges? A cartridge is an essential part of a shower or kitchen. It is an interior component of a faucet. This cartridge is responsible for controlling the water flow.
Overview of the Moen 1225 Cartridge
The Moen 1225 cartridge is designed to fit single-handle faucets for both bathroom sinks and showers. It’s found in popular Moen faucet lines like Chateau, Align, and Eva. This cartridge controls the mixing of hot and cold water with an internal stem and seals. Replacing it is one of the first steps for fixing a leaky Moen faucet.
But simply swapping in a new cartridge doesn’t always solve the leak. There are a few other potential trouble spots to inspect on your Moen fixture.
Top Reasons for Moen 1225 Cartridge Leaking
You replaced a new Moen 1225 cartridge some weeks ago. But this new cartridge leaked now. What are the reasons for this leaking? Let’s see below—
- Defective Cartridge
Suppose your new cartridge is defective. But you could not realize that. You inserted this faulty component in your shower.
As a result, now you are facing this problem. So, before installing a new cartridge, you should check it properly.
- Erosive Brassy Body
You know that water contains some elements like minerals, calcium, etc. These ingredients can make the body of the cartridge very erosive.
Water can go through the flaw into the brass body. At a time, this water may enter into the faucet.
The brass cartridge can destroy the soft areas in the shower. These destroyed elements can create a formation. For this reason, the cartridge loses its control to prevent the water flow.
You can use a particular type of cleaner. Before inserting the cartridge, you should wash its body with this cleaner.
- Faulty Seal
There is a seal in the faucet. This seal is used for inserting the brass and rubber into the faucet. To hold these materials tightly, the seal is very suitable.
After using it for some years, it may be damaged. If the seal is faulty, the cartridge will be leaked, and water will drop from the tap.
- Cracking O-ring
The cartridge may leak for the cracking o-ring. So, before replacing a new cartridge, you should check the o-ring.
- Worn Faucet Handle
It’s easy to assume that any leak requires a new cartridge. But often, the problem is actually within the handle and handle adapter components. These plastic and brass pieces can wear out over years of use.
Excess play, wiggle, and “sloppiness” when operating the handle indicates worn interior parts. As the precision fit between the cartridge stem and handle adapter deteriorates, small water leaks can occur. Replacing just the cartridge won’t fix a worn handle adapter seal.
Inspect your Moen handle closely for any looseness or wobble when rotating it. Confirm it fully returns to the “off” position when released. Spongy or sticky rotation can also indicate worn components.
To fix a leaky Moen handle, you’ll need to replace the handle, adapter, and likely the cartridge too. This restores the precise fit and seals within the handle interior. It’s a more extensive repair but key for stopping leaks.
- Damaged Valve Seat
The valve seat is located within the faucet body at the base of the cartridge. It’s a round brass fitting that has small inlet ports for hot and cold water. A tight seal between the cartridge and valve seat prevents water escaping externally.
However, normal wear and tear along with mineral deposits can damage the valve seat over time. Corrosion, pitting, and scratches allow water to leak through tiny gaps around the cartridge. Replacing just the cartridge won’t stop these bypass leaks.
Removing the cartridge provides access to inspect the valve seat. Look for cracked, warped, or scratched surfaces. Even minor imperfections mean it should be replaced. Doing so provides an even sealing surface for the new cartridge to mate against.
- Misaligned Cartridge
If the 1225 cartridge isn’t properly aligned and tightened during installation, water leaks can still occur. Keep in mind the cartridge must be oriented correctly before tightening down the retaining nut.
The plastic tabs on the cartridge indicate proper positioning. Make sure they fit into the notches of the faucet body. The cartridge should also slide down fully until resistance is felt.
Uneven tightening of the retaining nut is another issue. The cartridge must be drawn straight downward without any twisting. Unequal pressure can distort the seals. Tighten the nut incrementally using your fingers only – tools can over-torque.
Take your time with cartridge alignment and double check it’s correctly oriented before finishing the install. This ensures optimal sealing against the valve seat when tightening down.
- Missing Cartridge Clip
Moen cartridges include a small circular wire clip that fits into a groove on the cartridge body. This clip is essential to hold the cartridge firmly in the valve seat for a leak-free seal.
It’s easy to miss this key piece when removing an old cartridge. If the clip falls down into the faucet body, it must be retrieved. Without the retainer clip, the cartridge can work loose over time no matter how tightly it’s installed.
Check old cartridges closely for the removable clip. Make sure the new replacement cartridge includes this clip before installing. Take care not to lose the clip when swapping in the new one. Getting this small piece correctly in place helps prevent stubborn leaks.
- High Water Pressure
Excessive point-of-use water pressure (above 80 PSI) can overwhelm the sealing capability of cartridges like the Moen 1225. The high hydraulic pressures cause water to blow past the internal O-rings even when new.
The simplest solution is installing a whole house water pressure regulator. This reduces pressure to an optimal 50-60 PSI throughout your plumbing system. Point-of-use regulators can also be installed to lower pressure just at affected faucets.
Possible Solution and Replacement Process of Cartridge Leaking
If you replace the Moen cartridge properly after checking all the components, hopefully, you will not face the leaking issue after some days.
Did a replaced Moen shower cartridge still leak?
No worries. Follow the step by step methods-
- Turn off the Main Water Supply
Before replacing the new cartridge, you must turn the main water supply switch off. Then turn on the shower tap or faucet to bring out the extra water from the pipe.
- Gather all Necessary Tools
Managing necessary tools is an essential part of the cartridge replacement. For a particular component, you may need a specific tool. It won’t be good if you do not get the exact mechanism during the replacement.
- Take Essential Protection
You need to close the handle of the faucet slowly and carefully. If you try to close it quickly, the valve of the shower tap may be damaged.
You can use a cloth on the floor under the shower. For saving your floor from damage, it will be helpful. Or the small necessary thing may fall into the floor. This cloth will help you to find it easily.
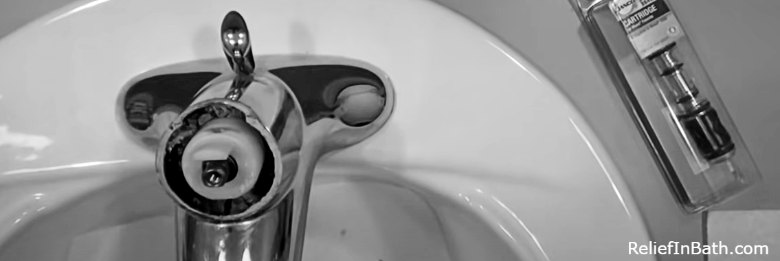
- Open the Escutcheon Plate
First, you need to detach the cover of the rubber. To pull out this cover, you can use a screwdriver. It is important to match the screwdriver with the screws.
Set the screwdriver and turn it until it is ready to release. Two screws are attaching the Escutcheon plate.
You have to pull out both screws. Then, remove this plate carefully. You may need Phillips or a flat-bladed screwdriver. So, keep these two close to your hand.
- Detach the Clip of the Cartridge
Now, it is time to use pliers. The shape of the cartridge clip is like the English alphabet “U”. You have to remove this clip from the valve.
Pull out the spacer washer. This washer is attached to the shaft.
Then, you have to pull out the stop tube. Slowly, pull out the tube from the cartridge and keep it aside.
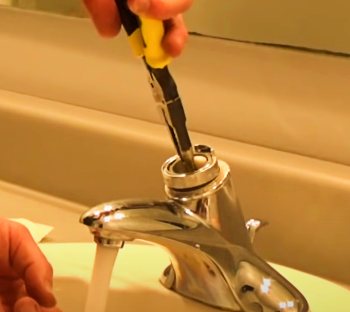
- Cartridge Removal
You should be ready now to remove the attached cartridge on the valve. Use the white-colored plastic tool and insert it on the cartridge stem for straddling.
Now, you need to use pliers. Hold on the white tool with your pliers and squeeze it to loosen the cartridge.
After loosening the cartridge, you should remove the white plastic tools. If you grip the cartridge, it will pull out from the valve body.
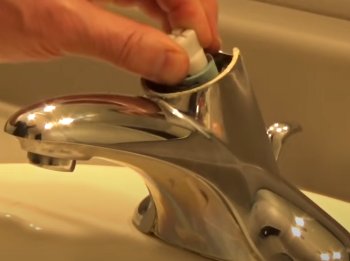
- Insert a New Cartridge
After removing the old cartridge, you will place a new one. Set it on the valve and press it into the valve’s body. Place the plastic tool and insert it into the cartridge.
The ears of the cartridge should be attached to the valve body. Keep in mind the upper and lower edges must be set correctly.
Then, lock the U-shaped clip with the valve body. If you do not close this clip properly, the cartridge will not be set up with the valve body. Attach the retention clip with the plastic nut.
Finally, adjust the faucet knob correctly.
- Turn the Water Supply On
After completing your cartridge replacement, you should turn on the water supply. To check it, you can turn on the hot water. It may take some moments to heat the water. So, wait a moment.
The water may not heat. In this case, you should re-attach the cartridge with the plastic tools.
- Final Touch
For a damage-free replacement, you should clean the valve body using sandpaper. You should be ensured that all screws and nuts are inserted tightly.
Lastly, I am pretty much sure you will find this troubleshooting video helpful for this particular problem.
FAQs
A new Moen 1225 cartridge should seal tightly with no leaks. But issues like incorrectly aligning the cartridge, damaged O-rings, high water pressure, or an underlying problem in the faucet body can all cause a brand new cartridge to leak. Carefully examine the cartridge, faucet interior, and handles to find the real source of the leaks.
If a Moen faucet leaks after a cartridge replacement, the likely culprits are a damaged valve seat surface, worn handle components, missing cartridge clip, incorrectly aligned cartridge, or high water pressure. The cartridge alone won’t fix leaks from these underlying issues. A thorough inspection of the entire faucet is needed to determine the leak source.
With shower/tub combo faucets, a dripping showerhead after replacing the cartridge usually means an issue with the tub spout diverter. Debris, mineral buildup, or damage in the diverter prevents it from fully sealing water flow to the showerhead. Try cleaning and lubricating the diverter assembly. If that fails, replacement of the diverter may be needed.
Brand new Moen faucets that leak right out of the box likely have an underlying defect or damage rather than a faulty cartridge. Potential causes include cracked solder joints, misaligned components, or a sand hole or pit in the faucet body itself. Check for any cracks and flaws. Remove the cartridge and inspect the interior faucet components too. If damage is found, replacement under warranty is recommended.
Wrapping Up
Leaking a Moen cartridge is not a big issue if you know how to replace it. Hopefully, now it is clear to you why the replaced Moen cartridge 1225 still leaks.
Nowadays, people face this leaking issue in the Moen cartridge. If you do not have enough idea about replacing this cartridge, it will be better to hire a replacement agency.
You can save the hiring cost by absorbing the replacement process and doing it yourself.
Recent Posts
Olivier Midy Face Oil Reviews From My Experience: Is It Worth It?
You deserve skincare that nourishes and revitalizes your complexion with natural ingredients. Olivier Midy face oil stands out with its blend of botanical extracts and promise of glowing...
Round Lab Dokdo Cleanser Review From My Experience: Is It Worth It?
Selecting a safe, effective facial cleanser requires evaluating skin barrier compatibility, surfactant stability, and pH optimization.You need a dependable face wash that lifts impurities cleanly...