Do you fancy knowing why your Delta shower cartridge stuck? You’re in the right place!
In this article, we will elaborate on the causes behind a delta shower cartridge getting stuck and further discuss how to rectify the issue.
To be fair, Delta shower is one of the best sellers; thus, it takes a toll on the users when it goes through generic wear and tears. So, don’t delay and keep reading to know how you can alter this misery.
Reasons You Have A Stuck Delta Shower Cartridge
The most vital reason for the shower cartridge to get stuck in dirt or mineral accumulation in the rubber O-rings. These O-rings bind the shower faucets to the rest of the appliance.
When the shower gets used for a prolonged time, the O-rings start to fuse to the valve and the cartridge. These mishaps are avoided when the plumber lubricates the cartridge before installation.
When minerals from the water start to build up, they can bind plastic and metal, adding even more barriers to the cartridge.
Moreover, if the cartridge hasn’t been serviced and has worn out, fixing it could be futile as it might ultimately need a replacement for total efficiency.
In cases of old cartridges and extreme build-up, you might notice the debris on the valves once you eradicate the handle. There may also be evident build-up on the exposed rims once the escutcheon has been taken out.
How To Remove A Stuck Delta Shower Cartridge?
Now that we understand the possible causes of this issue let us see how we can fix it without spending an arm and a leg on plumbing services.
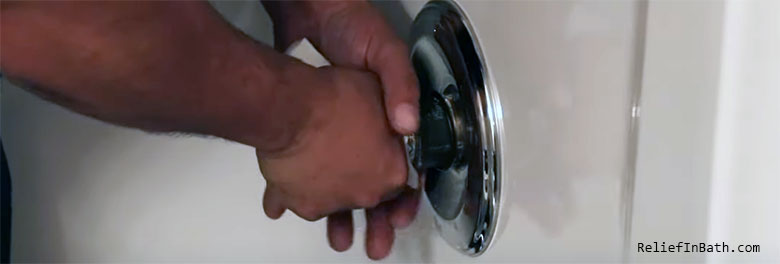
- Step 1 – Remove The Shower Handle
The first step is by far the easiest. All you have to do is take the shower faucet handle out. Now your shower could have the generic lever-style handle or any other.
However, you can get an idea about the style by viewing it from the front. If the handle lacks a set of screws, you can’t unhinge by unscrewing it. You should locate the set screws at the bottom of the handle.
You can disengage it if it’s an Allen screw by utilizing a 1/8 inch or a 3 to 3.5-millimeter hex wrench. The handle should glide off easily.
- Step 2 – Heat Or Soak Stuck Cartridge
If accumulated minerals are the sole culprit of a stuck cartridge, then merely plucking with pliers will not help. Moreover, sometimes heating the cartridges can soften the shower’s rubber O-rings, making the extraction easier.
Another great hack is to soak the rubber cartridges in vinegar solutions. Simply spray the vinegar solution generously around the affected area and let it sit.
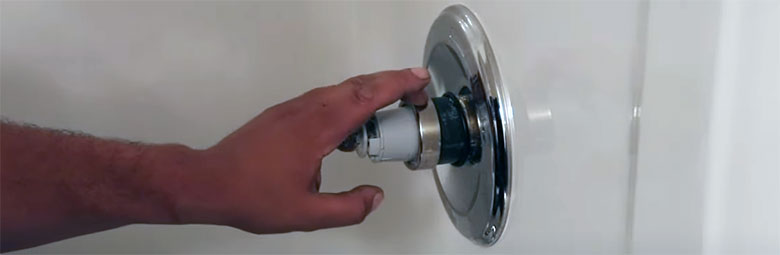
- Step 3 – Pull Out The Cartridge
You can utilize a cartridge puller when the solution has done its magic. This tool is essential in gripping the cartridge and pulling it out effectively. There is a universal fit cartridge puller, so that’s another win-win.
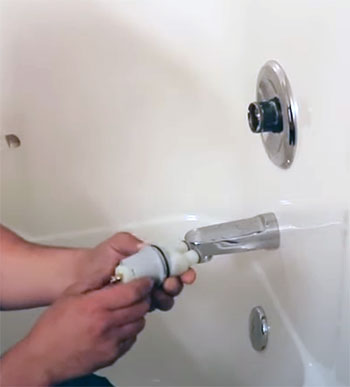
- Step 4 – Replacing the cartridge
After removing the handle, sometimes it gets pretty impossible to replace the former cartridge. This phenomenon occurs especially when the dirt and debris accumulated around the O-ring rubber and cartridge are too stubborn to be cleaned.
Moreover, when cartridges expire or wear out beyond repair, you might be left with no choice but to replace them with a new one altogether. Thus, before replacing the cartridge, ensure that the water flow is off in the washroom.
Put on a pair of safety gloves and unscrew the metal sleeve behind the handle. You can utilize a couple of joint pliers for this bit. Take the temperature-limiting ring, handle adapter, and cartridge one after another.
After slipping out the old cartridge, install the new one. You must ensure that you’ve purchased the same or at least a similar piece.
Apply a coat of grease to the rubber O-rings, align the cartridge’s mark with that of the valve housing, and voila! Lastly, reengage the shower faucet to finish off.
Watch this video to have a clear idea of how to remove it.
Delta Shower Cartridge Troubleshooting
Believe it or not, changing a cartridge takes greater effort and patience than a few troubleshooting DIYs. Even when everything looks A-Okay, it might not last long with the minerals barricading the cartridges and usual wear-outs.
Thus, these simple troubleshooting tips can help you maintain a healthy and clean delta shower in the long run. Let’s get into it.
- Flushing the valve
Before installing a cartridge, you can try flushing the valve to clear out any existing debris or sediment from the pipelines. If the valves are inadequately flushed before installing or replacing a cartridge, the efforts will be futile.
This will also give way to more blockages thus, reducing the water flow and pressure. Only removing the cartridge and clearing the obstruction might not provide total efficiency of the shower.
Therefore, flushing the valve is one of the most promising ways of clearing a stuck delta shower cartridge.
- Removing the showerhead
There are multiple components in the shower; hence, a dirty cartridge might not always be the issue. One way to regain proper water pressure and flow is by removing the showerhead and turning the water to clean out the pipelines.
This technique removes any potential dirt, rust, or mineral residue that could be blocking the showerheads.
- Valve functionality
Sometimes the valves do not function adequately even when everything is open and ready to go. This occurs when there’s an issue within the pressure-balancing spool inside the valves.
To examine it, remove the spool and shake it. If the component rattles, it’s all good. However, if it doesn’t, one way to fix it is by soaking the unit in a 1:1 water and vinegar solution.
This solution will effectively clear out any blockage or dirt that could deteriorate the piece’s quality, refraining from functioning correctly. On the contrary, if the spool still remains fixed and doesn’t operate, you might have to replace it ultimately.
- Orientation
This isn’t a hack in particular but more of a safety and preliminary step. When the orientation of the shower handle or cartridge is even a bit off, it can create havoc. Not only will it cause the water flow to be erratic but, it might also affect the shower leading it to malfunction continuously.
- Air vent valve
If your delta shower has a hot water recirculating system, you might have to look into it. Sometimes, when the delta shower isn’t getting water, the reason could be an obstruction in the air relief or venting system.
When people install or open the system to inspect any flaws, the air gets trapped in the recirculation valve. And, when air remains trapped for long in this valve, it ultimately stops the water flow becoming an obstruction itself.
Therefore, users need to open this air vent valve to allow the trapped air to escape. Consequently, if you use an automatic air recirculation system that stops proper water flow, it could be due to the plug malfunctioning.
Preventing Future Stuck Cartridges
While shower cartridges will eventually wear out and need replacement, you can take some proactive steps to maximize the lifespan of your Delta fixture and avoid stuck cartridges:
- Install a water softening system – Hard water is the enemy of smooth cartridge function. Softening your home’s water prevents scale build-up.
- Clean fixtures regularly – Give cartridges an occasional scrub with white vinegar and water solution to control deposits.
- Lubricate components – Use plumber’s grease on O-rings and rubber seals.
- Avoid leaks & drips – Small leaks allow mineral deposits to slowly clog inlet ports.
With proper maintenance and occasional cartridge replacement, you can enjoy hassle-free shower operation for years before needing to wrestle with another stuck Delta cartridge.
FAQs About Removing Stuck Delta Shower Cartridges
To remove a stuck Delta shower cartridge, start by shutting off the water supply and removing the handle, cover, and cartridge housing. Loosen the brass retaining nut holding the cartridge, then try tapping on the cartridge with a wooden block to dislodge it. Finish loosening the nut by hand then pull straight out on the stuck cartridge. Scrub any remaining deposits from the valve body before inserting a new cartridge.
The process is similar for removing stuck valve cartridges from other shower brands: Turn off water, remove trim pieces and valve cover to access the cartridge. Loosen the retaining clip or nut. Tap cartridge with a hammer and block of wood to free it from deposits. Pry gently with a flat screwdriver. Spray penetrant lubricant if needed. Pull out old cartridge once loosened, clean valve body thoroughly and insert new matching cartridge.
To remove an old worn-out shower cartridge, first turn off the water supply and take off all trim components to reach the cartridge. Loosen the retaining nut or screws holding the cartridge in place. Wiggle the cartridge back and forth while pulling straight out to remove it. An alternative is using a special cartridge puller tool inserted into the valve body for leverage. Check for any parts of the old cartridge remaining inside and remove them. Clean mineral deposits before replacing with the correct new cartridge.
Changing a Delta shower faucet cartridge involves:
1. Turning off water and removing handle, cover plate, and showerhead.
2. Taking out the retainer clip and pulling the cartridge stem out.
3. Greasing replacement cartridge O-rings.
4. Aligning new cartridge properly and pushing firmly to seat it.
5. Reinstalling retainer clip and valve stem.
6. Reattaching showerhead and testing water flow and temperature.
Be sure the new replacement Delta shower cartridge exactly matches your faucet model for proper fit and performance. Follow manufacturer instructions closely during the change process.n
Conclusion
So, are you worried about your stuck Delta shower cartridge? Luckily, those days will be long gone. Delta has served loyally for years.
Generic wear and tear don’t bring down its potential, features, and quality. However, knowing the causes and signs of such wear is also necessary.
That’s why we have put equal importance on detailing all the possible causes and solutions to this issue. Now the balls are in your court. Identify the signs and root cause and get to work!