H20 X5 is a very popular steam mop on the market that can make your bathroom cleaning easy for you. This steam mop uses hot steam to get rid of the bacterias on your bathroom floor, so you won’t need any chemical cleaners either.
However, as useful as this mop is, H2O X5 steam mop problems can also be a matter of slight concern.
So, in this article, I will be discussing problems you can face with this steam mop, how to determine them and most importantly, how to solve those problems. So, without wasting any time, let’s get to it.
Problems With H2O X5 Steam Mop With Fixes
Most of the issues I have encountered with H20 X5 were mostly regular ones, those you face with any steam mop regardless of the brand or model.
However, as different steam mops function differently, the solutions to the problems tend to vary from one mop to another. Here is a complete breakdown of some common issues H20 X5 problems commonly faced by the users.
- Water leakage
The first issue we have in our hands is the leakage issue. So, the water leakage can result in several inconveniences like running out of water frequently or releasing water more than necessary, leaving your floor flooded.
As your H20 X5 gets older, this issue tends to be more common for various reasons. So, I will be talking about them one by one.
- Overfilled Tank
As of now, an overfilled tank is most likely to overflow and cause water leakage. Every steam mop on the market comes with a certain water capacity for the tank, and H20 X5 is no different.
According to the tank size, the user fills up the tank and keeps doing it as it runs out of water. So if you plan to put more water in the tank than it actually can accommodate, it can leak water and eave your bathroom floor flooded.
- Damaged Parts
Another textbook issue that tends to happen over time.
If you have already tried lowering the water level in the tan and the water leakage still continues, you have to assume the leakage is happening due to damaged parts inside your H20 X5.
Now, there are multiple parts that can be damaged for various reasons, so it’s hard to tell about the issue with disassembling the steam mop.
If you look at the H20 X5, you’ll notice that it’s super easy to disassemble. Just disassemble the steam mop, and the damage should be at the tank, cap insert or filter.
If you can determine for sure any of these parts are damaged, the best option is to claim for the warrant or replacement.
If you still fail to notice any visible issue, then reassemble the parts mentioned above firmly again. At this point, you should have solved the water leakage problem of your H20 X5.
- Steaming Issues
There are different sorts of steaming issues you can face with your H20 X5. For example, reduced steam rate, inconsistent steam and even completely stopped steam is very common.
But, no matter what the steaming issue is for H20 X5, it’s caused by only one reason. That reason is limescale.
We are all familiar with that chalky stuff that builds up in our kettles, water heater or basically anywhere we heat the water. This is common stuff that we found in different water pipes and bathroom floors too.
But, over time, this chalky stuff that’s mostly calcium carbonate turns into hard and thin chunks of limescale. So, when limescale gets into the circulation hole of the boiler or in the tube, it can effectively stop your H20 X5 from steaming.
Troubleshooting Steaming Issue of H20 X5 Mop
There is absolutely no need to worry here as I am here to help you with a pretty easy or any special tool-less solution to this issue.
It’s a daunting problem for sure, but you’ll be surprised to know how easily you can fix it at home.
So here is a step by step guide on how you can remove limescale and get rid of steaming issues on your H20 X5.
- Step 1
First, let the steam mop rest for a few minutes to let it cool down. Then you need to unscrew the main body of the mop to get to the mop and the pipe out of it. Get a screwdriver and open the body.
- Step 2
Now that you have opened the mop, you’ll notice several wires as well as pipes going through it here and there. You will have to remove all of them to get to the boiler.
When you are disassembling those pipes and wires, make sure you remember the location correctly. It’ll come in handy later when you put the mop back together.
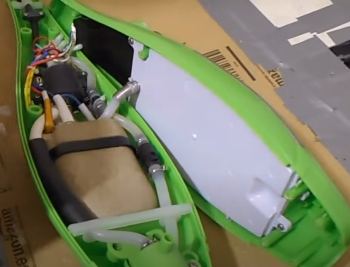
- Step 3
After removing all the pipes and wires, you should easily notice the boiler lying inside with a plastic cover. The cover isn’t attached with screws or anything, so you can easily just pull it off the boiler.
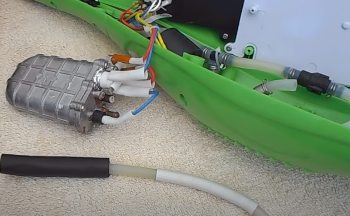
- Step 4
Once you get your hands on the little boiler inside, remove the power cable and the feed pipe from it with a plier to make the boiler dissemble easier.
If any wire is soldered, no need to remove that as soldering it afterwards will be another hassle.
- Step 5
Usually, the limescale buildup happens either inside the boiler or into the fed pipe. It’s relatively easier to clean the limescale buildup in the pipe because you can access it from outside.
But for the boiler, you’ll have to disassemble it to get to the limescale.
- Step 6
Now, what you need to do is disassemble the boiler. There are a few screws on top, and you should be able to open the top lid by unscrewing them easily.
While unscrewing, be careful about the seal between the top lid and the rest of the boiler. Damaging it might cause water leakage afterwards.
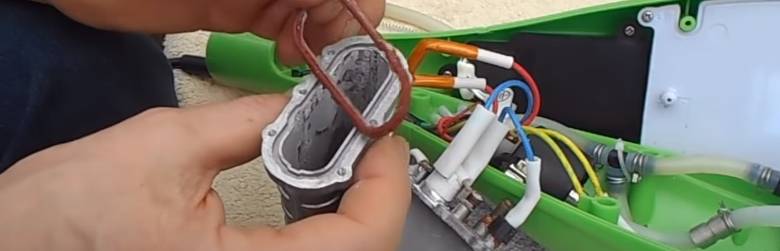
- Step 7
When you disassemble the bolder, you’ll immediately notice thing chunks of limescale on the inner surface of the boiler.
This limescale basically blocks the water circulation hole of the heater and stops the steam from passing through. A quick rubbing with the hand should remove the layers of limescale from the body.
- Step 8
As for the circulation hole and outlet, take a paper clip and straighten it. Now with that pin, just unblock the hole and the outlet.
After the hole, grab the feed pipe and remove its internals out. Inside the pipe, there is a metal spring where the limescale gets stuck. Clean that metal coil and put it back in the pipe.
- Step 9
As for the seal on the boiler, make sure it seals the boiler properly. If your unit has a silicon seal instead of rubber, it’s most likely to get ruined during boiler disassembly.
In that case, you can use a heat resistant concealer to do the job. After all the limescale is cleaned, put everything back together as they were.
Here is a effective troubleshooting video that will help you a lot!
Water Leaking Issue
Another common issue H2O X5 owners report is the steam mop leaking water as they clean. There are a few ways to address this problem:
Overfilled Tank
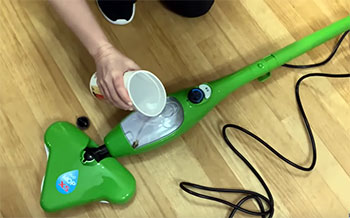
The most likely culprit is overfilling the water tank. Make sure you don’t exceed the max fill line. Overfilling can force water to leak from the steam vents.
Obstructed Float
A clogged or stuck float mechanism can also lead to leaking. Check that the float moves freely and isn’t obstructed. Clean the float with a cotton swab if needed.
Damaged Tank
In some cases, cracks, ruptures, or seal failures in the tank itself can cause leaking even when not overfilled. Inspect closely for any damage, and replace the tank if needed.
Loose Hose Connection
If the hoseconnecting the tank to the mop body has become loose, this may allow water to leak out. Tighten the connection securely.
Checking the fill level, float, and tank integrity can resolve most leaking problems. Make sure to only use distilled water as well, as impurities can obstruct seals and valves over time.
X5 Turned On But Not Heating
It can be incredibly frustrating if you turn on your X5 mop but it fails to heat up and produce any steam. Some things to check in this situation:
Working Electrical Outlet
Make sure the X5 is plugged into a functioning grounded outlet. Test the outlet with another device to confirm power is working.
Secure Power Cord Connection
Check that the power cord is fully plugged into the socket on the X5 handle. If loose, steam activation can fail.
Reset Button
If the reset button on the plug is popped out, press it back in. This button is triggered if the unit overheats.
Heating Element Issue
In some cases, an electrical issue or mechanical problem with the heating element may prevent the X5 from heating up. This requires internal repair or replacement.
Water Tank Engaged
The mop will not heat if the water tank is not fully inserted. Make sure the tank clicks fully into place.
Start by checking the power supply and connections. If those are fine, a deeper electrical or hardware problem is likely the culprit.
FAQs
Here are some frequently asked questions about troubleshooting H2O X5 steam mop problems:
If your X5 is not steaming, the most likely culprits are an empty water tank, a clogged or damaged steam nozzle, scale buildup inside the unit, or a problem with the heating element. Check those elements and descale the mop if needed.
Common reasons a steam mop stops producing steam include a lack of water, clogged nozzle or steam vents, excessive scale buildup, failing heating element, damaged power cord, or other electrical malfunction. Proper maintenance and replacement of damaged parts can often get it working again.
When functioning properly, the X5 is an effective steam mop that can sanitize floors and surfaces without harsh chemicals. However, some users feel it underdelivers on steam production compared to advertisements. Maintaining the mop and descaling regularly helps it live up to expectations.
If a floor steam mop fails to produce steam, the likely problems include an empty water tank, loose power connections, overfilled and leaking tank, a tripped reset button, scale buildup, or heating element failure. Checking these areas can reveal the cause for no steam output.
Conclusion
Here we are at the end of the article. Whether you own or planning to buy one, this article should be helpful for you to solve the H20 X5 steam mops problem and work as a heads-up for you.
However, on the bright side, this mop has other benefits that far outweigh the problems. So, if you are planning to buy one for yourself to clean your bathroom, just go for it.
Recent Posts
Olivier Midy Face Oil Reviews From My Experience: Is It Worth It?
You deserve skincare that nourishes and revitalizes your complexion with natural ingredients. Olivier Midy face oil stands out with its blend of botanical extracts and promise of glowing...
Round Lab Dokdo Cleanser Review From My Experience: Is It Worth It?
Selecting a safe, effective facial cleanser requires evaluating skin barrier compatibility, surfactant stability, and pH optimization.You need a dependable face wash that lifts impurities cleanly...