Do you have this problem of wetting the drywall around your shower? It’s pretty annoying to handle, no? Nobody wants to have a wall that’s chipping somehow. It makes the whole shower look bad.
Imagine someone coming to your home and seeing the chipped walls. Sounds embarrassing, no?. To save you from that embarrassment, I have the perfect solution. The solution will fix the drywall next to the shower getting wet.
I bet it’s intriguing you now, right?
Then, I won’t keep you wondering anymore; let’s get ahead and check out how you can get rid of the issue.
Common Causes of Wet Drywall Next to Showers
There are a few typical culprits when it comes to shower water creeping into drywall and causing it to become saturated. Being aware of these causes will help you pinpoint the problem and find the right fix.
Improper or Missing Shower Pan Liner
The shower pan liner is a critical waterproof barrier beneath the shower floor. It’s usually made from thick PVC or similar plastic sheeting. When installed correctly, it blocks any water that gets through the tiles or leaks from the plumbing from seeping into the subfloor below.
However, if the liner is missing, incorrectly laid, or has developed leaks, moisture can drip down to the wall framing and drywall below. A damaged pan liner is often the root cause of mysteriously wet walls near showers.
No or Insufficient Moisture Barrier on Walls
In many bathrooms, the contractor fails to install any kind of moisture barrier behind the shower surround tiles and walls. This leaves the drywall completely unprotected from water exposure.
Even just a few missing sections or gaps in a moisture barrier can allow shower spray and leaks to seep through to the drywall layer.
Improper or Missing Grout and Caulking
Grout fills the joints between shower tiles while caulk seals any corners, edges, and seams. When these are missing or applied incorrectly, moisture easily flows through the resulting cracks and crevices.
Over time, the grout and caulk can also crack, shrink, or fall out completely due to drying and normal wear and tear. This provides direct access for water to wet the drywall hidden behind the tiles.
Condensation Dripping Down Cool Walls
Cool showers meeting warm humid air can lead to condensation forming on the shower walls and ceiling. If severe enough, droplets and rivulets of this condensed water will run down and drip onto nearby drywall.
Drywall on exterior walls without proper insulation is especially prone to this condensation effect.
Plumbing Leaks
Leaking pipes, fittings, valves, showerheads, and drains inside the wall cavity will flood the space with water. Since plumbing components are often embedded directly into the drywall rather than just behind it, leaks from them quickly soak the surrounding gypsum boards.
Catching and repairing any leaking plumbing before the drywall gets too saturated is key.
Improper or Defective Surround Materials
Using the wrong surround materials can also lead to excess moisture exposure for drywall. For example, greenboard drywall without fiberglass facing lacks water resistance. Meanwhile, paper-faced backerboard will eventually absorb moisture if unsealed.
Low quality or defective boards that don’t meet manufacturer standards can absorb and transfer disproportionate amounts of water as well.
What Happens When Your Drywall Gets Wet?
Well, even though it’s pretty obvious that your drywall shouldn’t get wet, it’s something you can’t avoid at times, whether it’s because of the weather or the fact that the drywall is somewhere around a water source.
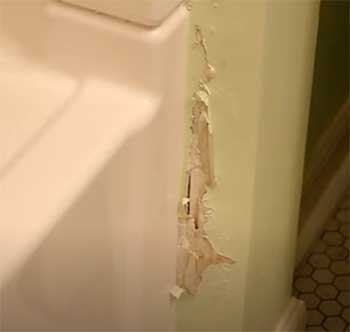
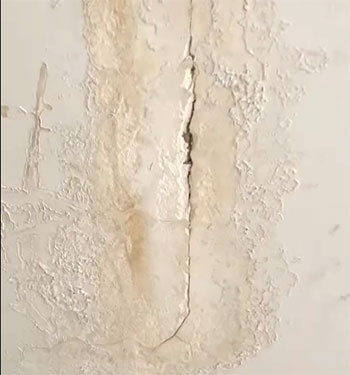
When the drywall gets wet, it starts chipping away and loses its structural integrity.
Because of that, the wall keeps getting weaker as time passes by. Drywalls are pretty sturdy and can go through a lot.
But that doesn’t mean you don’t do something about the water damage.
While it can make the walls weaker, it also builds up the possibility of mold growth on the wall. You don’t want that to happen, right?
Okay, let’s forget about the structural integrity and all the technical stuff for a moment. Another major issue that will get you scratching your head is the appearance factor.
With water damage chipping away on the drywall, you end up with a very ugly-looking surface around your shower.
If you already don’t know, the appearance of your shower has a lot to say about your home. It leaves a very compelling impression on the people who visit your house.
So, even if all the other things don’t matter, they truly impact how you see tackle this problem altogether.
How Do You Repair Water-Damaged Drywall Around The Shower?
Let’s get real here; you are only there to get the solutions to fix your wet drywall. I will take you through two simple methods that you can follow along very easily to fix your wet drywall.
- Method -1: Dry The Walls As Soon As You See Water
You can only opt for this method if the water damage isn’t that much. This means when you have very little water on the wall, you can just use a dehumidifier to dry the wall easily.
You can also use a fan to make the process even quicker.
What you do here is very simple. You have to use the dehumidifier while keeping your shower wholly shut down or sealed up. Let the dehumidifier do its magic.
After a day or 24 hours, you should take up a moisture meter and see check the moisture level of the shower.
This should quickly dry up your drywall around the shower if they are somehow wet. Yet, the thing I don’t like about this method is the fact that it’s quite time-consuming.
As I said, it takes about a day to properly dry your walls.
Well, if you are up for that, then don’t mind me. Go ahead with this method as it’s much easier than other methods.
- Method -2: Replacing Drywall
The only option you have when the condition of your drywall is very dire is to replace the drywall. As a rookie replacing the drywall may sound a bit too overwhelming, but trust me, it isn’t that hard to do at all.
With the right kind of tools and materials, you can replace the drywall without any trouble whatsoever.
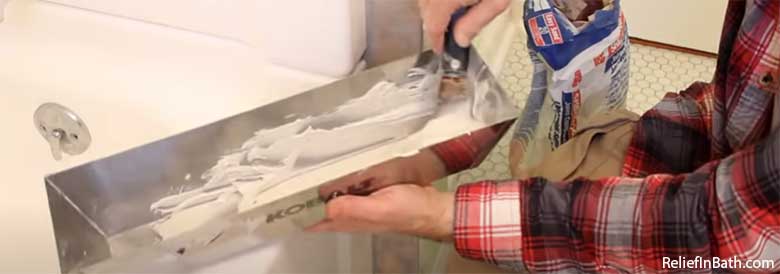
You will only need to follow three basic steps to replace your drywall with a new one when it gets damaged due to wetting. Even though I won’t be going through the steps in-depth, here’s a quick idea of the whole process.
- The first step is to remove the existing damaged drywall. It doesn’t matter if the wall is completely damaged or partially; you will need to remove any wet parts that you can see on the wall. You can use a knife or a crowbar to do that job.
- Next up, you will need to measure the area that you are cutting. Then, cut the same measurement from the replacement drywall. You can either use a hammer or a drill machine to install the wall.
- Finally, you will need to finish this process using the drywall compound. If you don’t know anything about this, I recommend you go through in-depth research on this specific factor.
Watch this video to see how it’s done.
With these three basic steps, you should be able to replace the drywall by yourself without too much trouble at all. However, if you are not confident enough to do the thing yourself, you can always hire professionals to get the job done.
- Install a Waterproof Shower Pan Liner
A full PVC pan liner under the shower floor is your first line of defense. It should cover the entire floor area with an upturn lip on all sides.
The liner gets sealed neatly to those upturns and any pipe penetrations. This creates a water-tight “pan” directing any leakage or seepage to the drain rather than into the subfloor.
- Use Cement Board for Wall Surrounds
Cement board like HardieBacker or Durock is inherently waterproof and won’t absorb moisture like drywall.
While moisture barriers behind tile add another layer of protection, using cement board everywhere around the shower perimeter ensures water can’t reach the drywall even if it gets through the tile somehow.
- Apply a Membrane or Barrier Behind Tiles
Covering the drywall before tiling with a waterproofing membrane or barrier provides inexpensive, reliable protection. Liquid-applied membranes like RedGard or sheet barriers like Kerdi create a seamless waterproof coating over the boards.
Even dense plastic sheeting works in a pinch. This membrane keeps water from ever touching the drywall behind.
How To Prevent Water Damage On The Wall Next To The Shower?
Yes, it’s great if you know how to solve a problem. But you know what’s better? It’s to prevent the problem from happening in the first place. And that’s what I am going to discuss right now.
It’s the process or ways of preventing any kind of water damage on the drywall around your shower.
Fortunately, there is something that you can do to make sure that you are not facing the water damage issue on your drywall. It uses the drywall sealer for the bathroom.
You can find your preferred drywall sealer online and use that before you when installing your drywall. This gives you a great protective layer on the drywall that can help in keeping water damages to a minimum.
Another solution you can try to prevent any kind of water damage on the drywall is to use a kerdi band. Using the band can give you a waterproof wall and don’t leave any room for damages.
You can also try using plastic layers or curtains to protect the drywall around your shower from getting wet. But this isn’t that stable in terms of a proper solution.
Also, you will have to go through quite a lot of maintenance with the curtain itself.
When you follow these tips or ways, you can protect the wall next to the shower from getting wet. It doesn’t matter how much water your drywall comes across. You won’t have to worry about it getting damaged from the water at all.
Frequently Asked Questions (FAQs)
The best ways to protect drywall from shower moisture are to install a waterproof pan liner under the shower floor, apply a membrane or barrier like RedGard behind the tile and surround, maintain the grout and caulk, seal all seams and edges, replace damaged boards quickly, and fix any plumbing leaks promptly. Using cement board rather than drywall for the surround is also highly recommended.
No, it’s never advisable to let drywall get wet at all, even just a little. Even small amounts of moisture over time can cause mold, mildew, rotting, rust, and other problems. Drywall is inherently not water-resistant, so any showers or tub surrounds should have proper waterproofing layers like pan liners and membranes to keep the underlying framing and boards completely dry.
Install a shower pan liner to waterproof under the tub. Cover all drywall surround walls with a membrane like RedGard or tile backer panels before tiling. Use silicone caulk to seal gaps between the tub lip and bottom row of tile. Make sure any plumbing penetrations are sealed as well. Maintain the tub caulking and grout to prevent water intrusion through cracks.
The best practice is to not use regular drywall at all next to shower enclosures. Cement board, moisture-resistant blueboard, or other suitable tile backer products should be used. If you must use drywall, coat it with a waterproofing membrane like RedGard before tiling to create a water barrier, and be extremely diligent about sealing all edges and maintaining grout and caulk.
Conclusion
In a nutshell, drywall next to the shower getting wet can be a huge matter of concern; there is no denying that. But as you already saw, there are so many things that you can do to solve the problems.
Whether you plan to replace the drywall or you choose to fix it depends on the damage.
Typically, replacement is the best option as repairing it will last only for so long. Still, if you think the damage isn’t that much, then you can still try and repair the drywall by just drying it out.
Everything aside, I think trying to maintain the preventive measures is still the best thing you can do if you have drywalls around your shower.