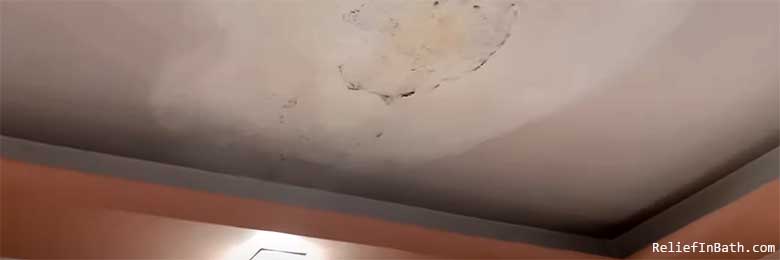
Are you in doubt about waterproofing the bathroom ceiling or not? When your washroom ceiling is not waterproof, it may be attacked by mold, mildew, and other moisture-related things over time.
If your bathroom has tile installation, it is necessary to waterproof your bathroom ceiling. Otherwise, it will lead to water penetration issues especially, for steam showers and rooms.
We will walk you through how to waterproof your bathroom ceiling using a waterproof membrane. Let’s begin!
How To Waterproof A Shower Ceiling Step-by-step?
If you are determined to waterproof your bathroom ceiling, you will need some important items and tools to complete the task. Here is a list of them.
- Things you will need:
- Sponge
- Waterproof membrane
- Thin-set mortars
- Finishing knife
- Waterproof membrane strips
- Trowel
- Preformed waterproof membrane corners
- Prepare Ceiling Backing
At first, you have to work on the ceiling backer board. If you have not cleaned for months, it may already accumulate lots of dirt and dust.
Making it super clean is necessary. Otherwise, you will fail to attach the thin-set properly. You can utilize a damp sponge to clean it.
Don’t make the surface fully dry. Keeping it slightly damp will give the extra advantage of applying the thin-set conveniently.
- Mix Thin-Set Mortar
So, the first step is done. Now, you need to attach a waterproof membrane and unchanged thin-set mortar together to apply them on the ceiling board and tile.
Thin-set mortars are generally adhesive material. They are made of combined sand, water, and cement.
Special additives are also included in them to increase their bonding power and make them more resistant to water.
Instead of adding water separately later, you have to add water while making a mixture. Don’t mix all batches of thin-set at a time. Instead, add only a few of them.
You will have only 15 minutes to use them before they become hard.
Make sure to follow the instruction manual to mix water and thin-set. Don’t pour all components into the container at a time.
First, fill the container with half amount of water. Then add the thin-set. Mix them evenly. Finally, add the other remaining items.
The thin-set should be as thick as peanut butter but perfect for holding a trowel. After applying the thin-set on your preferred surface, it will dry up quickly. As we already mentioned, work only on a few bathes since they dry rapidly.
- Install Waterproof Membrane Sheet
Now, take a few sheets of waterproof membrane to set up them with thin-set mortar.
You can use any side of the waterproof membrane sheet since both sides have adhesive things for better stickiness with thin sets.
Moreover, you can easily cut these membrane sheets into pieces in various shapes based on your bathroom structure. This makes them incredibly flexible.
If your bathroom is huge, you may need several rolls. Make sure the ceiling backer board you have chosen is compatible with your shower, especially if the board is drywall.
Plus, a waterproof membrane should be also perfect for use in your bathroom.
Apply the thin-set on the ceiling in a flat direction instead of circular motions. Make sure to use the flat side of the trowel while spreading the thin-set and creating a thin, smooth layer.
Then use the notched side to add another coat.
Now, gently place the waterproof membrane into the thin-set. Make sure to fully attach the entire sheet on the thin-set so that no air is inside them.
You can use a finishing knife for complete adhesion.
- Join Seams With Waterproof Membrane Strips
The next task is sealing the membrane sheets among their joints. You can use waterproof membrane strips for better adhesion.
In order to make a proper connection with the seams, you can use a 2-inch strip overlap. Grab your trowel and use its flat side to firmly and deeply attach the strip into the thin-set.
- Install Waterproof Membrane Preformed Corners
Now take a few preformed waterproof membrane corners and set up them on all sides of the bathroom corners. Then, apply a thin-set in all corners one by one using the trowel.
At first, use the flat side of the trowel to create a thin layer and put another thicker layer by using the notched trowel side.
- Hide Ceiling-To-Wall Transition Edges Using Waterproof Membrane Strips
Finally, you have to seal the ceiling-to-wall transitions to finish the waterproofing project. You can use a few waterproof membrane strips and thin-set to cover them properly.
Additionally, in order to prevent buildup issues at edge regions, use a single piece of 2-inch overlap. Fold the strip as per the edges to make it effortless to install.
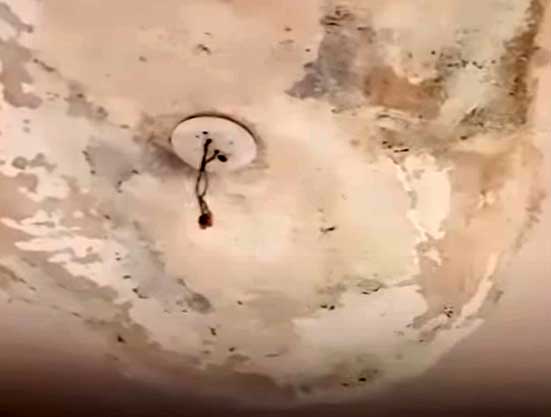
How To Protect Ceiling Above Shower from Mold?
If your bathroom ceiling has already developed mold, you are already in serious problems. Addressing the problem soonest is crucial.
- Homemade Solution
One of the simple yet effective ways to protect your bathroom ceiling from mold is using a mixture of warm water and detergent. Alternatively, you can use white vinegar or diluted bleach to clean the mold.
Wash the ceiling using the mixture of warm water and detergent, and then let it dry properly. But when using white vinegar or diluted bleach, you have to follow a unique method.
Add the white vinegar to a container and spray the thoroughly on the ceiling area. Keep it in that condition for 1-2 hours. Finally, wipe the region using clean water. Then let it dry properly.
- Ensure Enough Ventilation
If your bathroom doesn’t have any windows, ensuring enough ventilation will be a problem. In such cases, you can set up a bathroom ventilation fan.
This will decrease the development of mildew and mold in your washroom. But, many latest bathrooms feature one or multiple extractor fans to control mold issues.
If your bathroom has already a ventilation fan but still facing mold issues, you can install new windows and doors for extra ventilation.
- Anti-mould Paint
Anti-mould paint is a special paint, which prevents the development of mold on bathroom ceilings and other areas.
You can even use this paint on areas where your bathroom is exposed to ample air humidity and condensation.
Make sure to clean the cleaning appropriately before using the Anti-mould paint. This will better performance. They can last as long as 6 years if you use the paint in the right way.
Besides, try choosing the paint from a reliable so that it can last a long time to repel condensation and mold.
But remember, this type of paint is not 100% waterproof. Your bathroom ceiling may have water damage in the future if there is heavy traffic.
Conclusion
Just like our living or bedroom, we want to ensure a comfortable environment for our bathroom. If your bathroom ceiling is not waterproof, you may end up facing various issues.
By waterproofing the bathroom ceiling, you can keep it free from mold, and other moisture-related problems.
We have already discussed all the steps you need to follow to waterproof bathroom cleaning easily. Since it is a simple DIY project, anyone can do it.
All you need is some basic items and create a waterproof layer on your bathroom ceiling. Make sure to use all the essential items to make the ceiling 100% waterproof.
Recent Posts
Olivier Midy Face Oil Reviews From My Experience: Is It Worth It?
You deserve skincare that nourishes and revitalizes your complexion with natural ingredients. Olivier Midy face oil stands out with its blend of botanical extracts and promise of glowing...
Round Lab Dokdo Cleanser Review From My Experience: Is It Worth It?
Selecting a safe, effective facial cleanser requires evaluating skin barrier compatibility, surfactant stability, and pH optimization.You need a dependable face wash that lifts impurities cleanly...