Do you find unusual moisture accumulated around your toilet base all of a sudden? This might occur due to damages to the seals or a poor drainage system.
That means it’s time to change your toilet bolts without removing the toilet!
Replacing the toilet bolts might seem like an easy task to do, but in reality, it takes much more effort than replacing the toilet itself. This is because it would be an easy task only if the toilet bolts were not corroded.
Corroded toilet bolts need to be removed very carefully, keeping in mind that the toilet might be too corroded to bear new toilet bolts.
So, to get some exclusive tips on how to replace toilet bolts, keep on reading.
Replacing Toilet Bolts Without Removing The Toilet
In a normal situation, you can very easily follow a few simple steps. But sometimes, it becomes beyond repair as the toilet gets corroded.
Before starting to change the bolts, let’s cross-check the tools you need to do the job.
- Necessary Tools to Change Toilet Bolts
Listing out things you might need to do your job saves you from the last-minute panic attacks when you can’t find a tool for your work.
So, you should always keep these following things handy while replacing your toilet bolts.
- Pilers
- Wrench
- Spray Lubricants
- Safety Masks and Gloves
- Toilet Bolts
- Nuts and Washers
- Wax Ring
Now you’re good to go for the repair work. Buckle up, and don’t forget to wear your safety kits before jumping into the repair.
We have prepared a simplified guide for you to follow. The following steps would guide you as a manual for repairing toilet bolts.
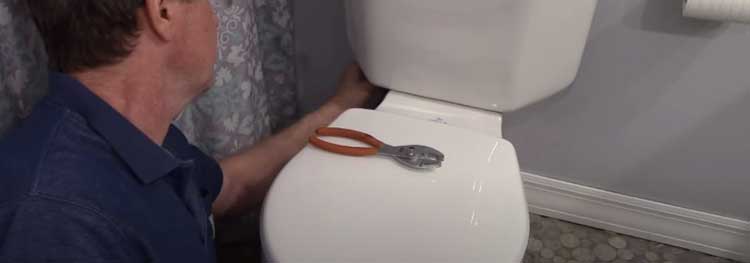
- Unscrewing the Nuts
The first step to changing the bolts is to unscrew the nuts carefully. You need to turn off the water supply for the toilet by turning off the control valve. Now, flush the toilet keeping the handle down.
To have a clear view, keep the lids open. You can just sponge away the water or moisture to avoid unwanted moisture.
Now remove the plastic caps using the screwdrivers. Once the plastic cover is removed, use some spray lubricants in the toilet bolts and unscrew the nuts using a wrench.
To do so, hold the nut in one hand and unscrew it using the other in an anti-clockwise direction.
- Cleaning Wax
Once you have successfully removed the nuts, lift the toilet’s bolts off and dump the water remaining in the internal pipes.
Take a paint scraper or anything similar to that to clear out the wax around the flanges of the toilet.
Remember to wear your rubber gloves and safety masks before dumping out the old wax.
Now, once you are done cleaning up the old wax, have a look at the flanges.
See if it is damaged or broken and if it was causing the unusual water to float around the toilet or not. If damages are seen, take necessary steps to fix it or replace the flanges in the toilet.
- Inserting New Toilet Bolts
After the inspection of the grooves and flags is over, you have to insert new toilet bolts. To do so, first, clean up the old wax.
Now, you need to insert the new set of toilet bolts by putting them into the open ends of the grooves.
Next, slide them in by turning them over and over again until the heads are locked properly against the back part of the flanges.
Now take a new wax ring and push it right into the wash outlet. Remember to clean up the old wax off the base of the toilet before putting up the wax ring.
Make sure to properly guide the wax rings in the base while lowering it in place and then compress the wax ring, push it down, and let it set.
- Screwing Back the Nuts
Lastly, you need to screw the bolts back in their place. To do so, take a plastic cap holder and metal washer and put it over each bolt while you screw back the nuts.
Keep tightening the bolts as much as possible and even run it over with a wrench to make sure it’s tight even not to loosen up. But remember that you should not overtighten them.
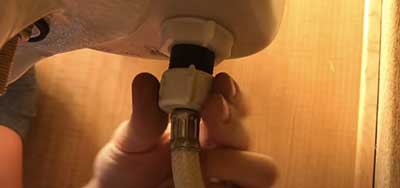
Now when you are done screwing the nuts back to their place, fill in the tank by turning on the angle stop. After that, flush the toilet a few times and check if there is any problem with it.
A good tip would be to check if the floors of your toilet are wet and its leaking. If you see any kind of leakage in the toilet floor, it is better to do the repairments necessary before replacing or removing the toilet.
These were the basic steps of removing the toilet bolts without removing the entire toilet. Now, watch this video to understand more about it.
Other Issues With Toilet Bolts
Even after you have fixed and replaced the bolts in the toilet, there might be some difficulties with leaking water in your toilet:
- Toilet Bolts Won’t Tighten
Sometimes while putting back the screws, you might see that the bolts won’t tighten. This might happen when the wax ring inside the toilet is rusted or damaged.
In this case, changing the flanges alone wouldn’t do; the entire toilet must be repaired or replaced in order to stop the leakage of the water around the toilet base.
- Toilet Anchor Bolts Spinning
There is an adjustable float that controls the water level in the tank of the toilet. Any damage to this float might either cause a weak flush when the level is set too low or spill water out of the tank if the level is set too high.
This causes the anchor bolts of the toilets to spin. The solution to this problem might be adjusting the adjustable float and the flapper chain or flush handle.
Sometimes, the flapper needs to be changed if the damage is way too much and beyond simple adjustment repairs.
- Toilet Anchor Bolts Loose
Sometimes, while putting back the screws, one can mistakenly tighten the screw too much or beyond the holding capacity of the porcelain inside of it.
This results in breaking the porcelain and ruining the mechanism of the flange.
That is why the anchor bolt loses up its grip. In this case, the only solution is to remove the flanges and replace them with a new one.
Otherwise, the water would keep floating around the toilet base.
The aforementioned were some common problems people face changing their toilet bolts as beginners. They often do everything right, but some things go wrong, which they cannot figure out quite easily.
Knowing about a few of these problems would help you avoid them while removing the toilet bolts without removing the toilet.
Final Words
Following through the steps mentioned here and keeping in mind the probable problems would make your life a bit easier.
Replacing your toilet bolts is an easy task, which you can do without calling the plumber and saving some money. But if the situation gets really out of control, do call a plumber to fix the mess.
So, there you go. That is how you remove the toilet bolts without removing the toilet.
Recent Posts
Olivier Midy Face Oil Reviews From My Experience: Is It Worth It?
You deserve skincare that nourishes and revitalizes your complexion with natural ingredients. Olivier Midy face oil stands out with its blend of botanical extracts and promise of glowing...
Round Lab Dokdo Cleanser Review From My Experience: Is It Worth It?
Selecting a safe, effective facial cleanser requires evaluating skin barrier compatibility, surfactant stability, and pH optimization.You need a dependable face wash that lifts impurities cleanly...