I’ve often complained to my friends and blurted out that my shower is leaking through the floor, in desperation search for a remedy.
However, the truth is that sealing a leaking floor is more straightforward than most people think.
Yes, that means a fix without completely taking out the floor tiles. So, sit back and read through this article as I share how to fix leaking tiles with the simplest DIY tricks.
You will not be disappointed!
How To Seal A Leaking Shower Floor?
Tiles are porous elements; therefore, waterproofing them has higher and long-term benefits, especially when it’s your bathroom floor tiles.
But the good news is that sealing a leaking shower is straightforward.
In fact, so straightforward that many homeowners have been taking matters into their own hands for a while.
With the help of some DIY materials, which are readily available in your nearby hardware store, you can seal and forget about leaks on your bathroom floors. So without further ado, let’s see how it’s done.
What You Will Need –
- A silicone sealant
- Grout sealer or shower plug tile
- Roller or a natural bristled brush
- Masking tape
- Mask and gloves
- Cleaning cloths
Now, follow the steps carefully:
- Clean The Shower Area
It’s essential to eradicate all possible mold and dirt that may be stuck or hovering around your tiles or grout.
Moreover, for the smoothest application and a successful DIY, it’s a must that you scrub away all dirt from your shower and wait for the area to dry before proceeding.
- Secure the area of your DIY
You can use masking tapes to secure taps, glass windows, walls, or silicone strips from the shower plug. This step is necessary as you don’t want any build-up on the faucets, walls, or windows nearby.
- Wear safety gear
Put on your protective mask and gloves to enhance protection for yourself. Another point to note before beginning is that you require proper ventilation during this process.
Thus, you must open up all the doors and windows of your bathroom.
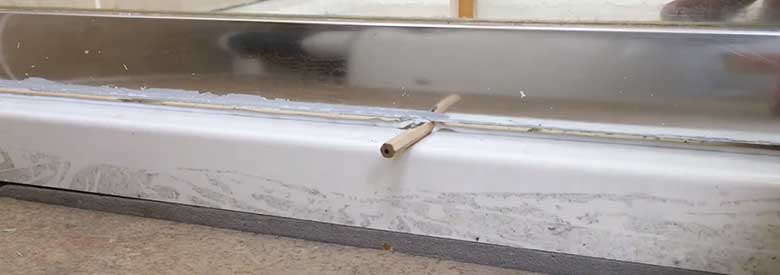
- Coat the leaks with the shower plug
Next, you need to grab the bristle brush and paint on a coat of the shower plug on your shower’s floors or the affected area.
After applying the first layer, wait for five minutes for the coat to dry, and then proceed to layer on a second coat.
After applying the second coat, wait another five minutes for the mixture to dry. Afterward, wipe away the excess product using a cleaning cloth.
Disclaimer; if you notice that the grout is extensively damaged, such as there are noticeable holes, brittle spots, cracks, and loose ends, you must remove it first.
You can do this job using any handy metal tool or grout rake. Once the worn-out grout is removed, sweep the dust and vacuum the new grout.
Let the grout dry entirely and remember, that drying should take at least 4-5 hours in total.
- Repeat the process with other affected areas
Now, to seal off any other walls that may be leaking, you can utilize the same brush and coat the damaged area with a shower plug or grout sealant.
After application, wait for five minutes before reapplying. Consequently, you need to wait another five minutes after the second layer. Lastly, wipe off the excess product using a cleaning cloth.
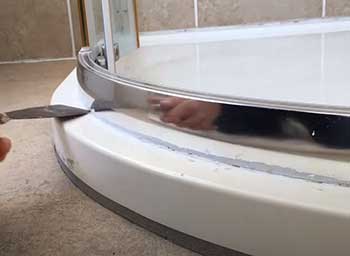
- Seal the joints
Next, to round up this DIY project, you have to apply a suitable quality silicone joint sealant on the floors. This step will prevent future cracks and serve you for the longest time.
- Wait for the layers to dry
Shower plugs usually take around 12 hours to dry out completely. This product will dry down to a completely invisible finish.
- You’re done!
Once all the silicone and sealants have dried down, it’s time for you to take a test run. Hope back into the shower and take a relaxing bath.
Rest assured, when you use this DIY and these products, a floor leak should be the last thing you need to worry about.
Water Leaking When Shower Is On
If you’ve been spotting moisture around your floors, especially around your bathroom area, or dripping from the ceiling, you probably have a shower leaking somewhere around.
These water leaks can be traced back to specific issues in most cases. Let’s see some of the causes that could trigger leaking shower floors.
- The first reason could be a leaking gasket in the shower drain. Gaskets in the showers act as a sealant between the shower’s drainage lines and the floors. Over time, when the gasket wears out and starts to crack, the leak will spread out, causing a leak.
- Secondly, shower leaks, primarily when it’s turned on, can also be caused by a clogged drain. When the tub pans overflow, it causes water leaks all over the floors and even ceilings if you have a two-storied house.
- Water leaks can be traced back to damaged or broken shower faucets. However, if you notice that the shower leaks even after turning off the faucet, there could be a leak in your bathroom wall. Generally, these can also be traced back to a damaged gasket or O-ring.
- Damaged tubs or tiles are another common reason for leaks in the shower. Even though tiles may be constructed with proper care, they need an extensive waterproofing system so that they don’t wear out over time. When the floor tiles crack, they can damage the grout lines.
Moreover, the water can seep through these leaks and reside in your walls and foundation. This will eventually cause a puddle which will start to soak and leak through the floors.
- When water leaks visibly after turning on the shower, it can be caused by loose or broken pipes. In such cases, the moisture or leak is evident when the shower is turned on.
These are some preliminary signs and causes that can give you an insight into deep-seated issues.
If you know the cause and place of the leak, you can look for its respective solutions, whether it’s via DIYs or by taking professional help. So, let’s see how you can fix a leaking faucet when the water is running.
- Step 1
First, remove the shower cover cap and handle by unscrewing it and pulling it out.
- Step 2
Next, you need to remove the faceplate and set it aside. Now, each faucet and shower are set differently. But for the most part, they come off the same way.
Utilize a set of screwdrivers to disengage them.
You should be exposed to the pipes and valves inside the foundation. Remove the top two screws that hold the escutcheon trim plate stagnant and pull out the component from the wall.
This will expose a hole within the wall around the shower valves.
- Step 3
Glide off the stop tube that resides on the exterior. All you have to do is grip and pull it towards yourself.
Afterward, eradicate the brass bonnet with the help of a set of locking jaw pliers and turn the tool in a counterclockwise direction.
- Step 4
Take out the old, worn-out cartridge by pulling off the visible plastic cap. You can grip and wiggle it out of the cartridge until the tool loosens up enough to be pulled out.
Remember not to be too harsh during any of these steps.
- Step 5
Now, inspect and feel the insides of the valve area. Clean it using a cleaning rag if you notice or feel any visible particles, deposits, dirt, or grime.
- Step 6
Insert the new cartridge into its designated spot and push it firmly in position.
Before doing so, note that one of these cartridges is supposed to be marked as ‘hot,’ and that’s where the cartridge should be placed. The hot watermark is usually designed to be on the left side.
- Step 7
Place the brass bonnet back on the shower valves and tighten it by turning it in a clockwise direction.
Ensure that the threads of the brass bonnet grip onto the latch properly and then hand tighten it if necessary. For a more snug fit, utilize locking jaw pliers.
- Step 8
Next, you must clean the wall where the escutcheon plate is supposed to go. Afterward, place the outer sleeve on the cartridge and then push it back into its old place.
Secure them properly and replace the escutcheon handle and plate adequately.
- Step 9
Lastly, turn on the water supply and check if everything works fine and the leaking has stopped. If it does, then you’re good to go!
And watch this video!
Conclusion
DIYs are a simple gateway that can make our lives easier while living within a budget. However, when the leaks seem impossible to control with a few DIY tweaks, use expert help and call in a professional.
On the brighter side, complaints such as, ‘my shower are leaking through the floor;’ have come to an end. We now know the preliminary signs and possible causes to get started and fix our place of relaxation.
Recent Posts
La Roche Posay Effaclar Purifying Foaming Gel Reviews: Is It Worth It?
You want a cleanser that tackles oil and impurities without stripping your skin. The La Roche Posay Effaclar Purifying Foaming Gel does exactly that with gentle yet effective...
Bluevua Reverse Osmosis Review From My Experience: Is It Worth It?
You deserve clean great tasting water without complicated installations or constant bottle purchases. The Bluevua countertop reverse osmosis system delivers pure hydration through advanced...