Do you hear weird noises after you flush your toilet? Or sometimes, a leaking valve can be pretty evident and right in front of your eyes.
If that’s the case with your flush system, then stick here a little longer, as I will discuss this exact matter.
When you have a Fluidmaster fill valve leaking from the top, it can get pretty disturbing at times. Usually, when that happens, the solution is to replace the fill valve completely.
But with the Fluidmaster fill valve, you have an option to repair it.
Don’t know how you can do it? Well, that’s what I am here for. Here, I will go through the method of fixing the Fluidmaster fill valve for any kind of leaking issue.
Let’s not waste any more time and get right into it.
What Causes a Fill Valve to Leak?
There are a few key issues that can cause water to leak from the top of the fill valve:
Sediment Buildup – Over time, mineral deposits and sediment can build up on the seals and moving parts inside the fill valve. This prevents a proper seal and allows water to drip out.
Broken/Damaged Flapper – The flapper is the rubber seal at the bottom of the fill valve that opens to allow water flow into the tank and closes to seal water in the tank. If it becomes warped, cracked, or worn out, it won’t create a tight seal and will drip.
Incorrect Fill Valve Height – If the fill valve is set too high in the tank, the extra pressure can cause water to spray out from the top when the valve is open.
Fill Tube Connection – A loose connection or damage where the fill valve attaches to the fill tube can result in spraying or leaking water.
How To Fix The Fluidmaster Fill Valve?
The process isn’t that difficult when it’s about fixing the Fluidmaster fill valve. You can do it yourself; all you have to do is follow some steps.
If you are experiencing any leaking issue from your fill valve, then it’s time you go through some repair on it.
Also, replacing the valve after five years can be good to maintain. This keeps away all the risks of flooding from the valve.
Now, for the repair work you don’t need too many things. You will only need the Fluidmaster fill valve cap replacement or replacement seal, a mug, and a pair of protective gloves.
Having these things is enough to proceed with the repair work. Here are the steps you need to go through to fix the fill valve.
- Turning Off Water
First of all, you have to look for the shutoff valve. You will need to turn it off, so the water supply stops into the toilet tank. Or else, you can’t even begin the repair process of the fill valve.
To turn off the water supply to the toilet tank, you simply turn the shutoff valve handle in the clockwise direction.
This should stop any water from going into the toilet tank. Then, you can proceed to the next steps.
- Flushing The Toilet
Next up, you have to flush your toilet. This will get all the remaining water in the tank out so that you can work on the tank and fill the valve correctly. This is also very important for the convenience of working.
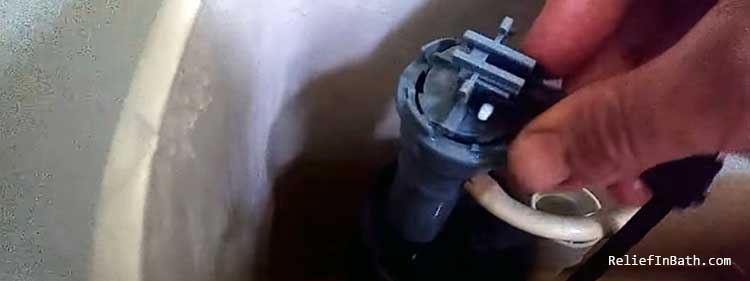
- Removing The Plastic Cap Of The Valve
Now, if you face the toilet fill valve cap leaking issues, you have to start with removing that first.
When you clean up the whole tank and get rid of all the water, you should see a plastic cap on the fill valve. You have to remove that to proceed further.
You have to hold the fill valve shaft with one hand to remove it. Then, you have to slide up the shaft to push the float cup.
Make sure you grasp the shaft very firmly. Otherwise, the whole thing goes to waste.
Now, while holding the shaft, use your other hand to turn the cap that is placed on the fill valve. Try pushing down the cap while you turn it in the counterclockwise direction.
When you see the cap coming loose, simply take it off and keep it separately.
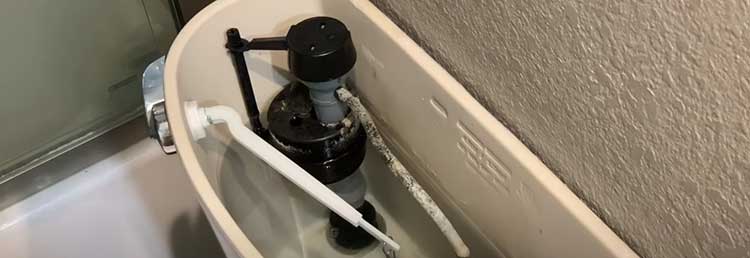
- Place A Mug On Top
After removing the cap, you have to take a cup or mug and place it on top of the valve upside down. You have to hold it there for a while as this relates to the next step.
- Flushing Shutoff Valve
While holding the cup with one hand, you have to turn the shutoff valve counterclockwise to open it with your other hand.
You will see water flowing from the fill valve and getting into the cup. Then the cup drives the water into the toilet tank. Now, you probably understand the use of the cup.
The reason for flushing the valve is simple; it takes away all kinds of debris you might have had on the valve. You have to finish this step by closing the valve.
- Removing The Old Seal
Here’s the part you should be concerned with the most. You have to remove the old seal of the fill valve to replace it with a new one. To do that, simply get the valve cap and take out the seal from there.
- Installing The New Seal
For installing the new seal, you have to position the seal properly first. The orientation of the seal has to be accurate. So, here’s how it goes.
You have to place it in such a way that the nipple of the seal fits it perfectly. It’s usually placed over a stainless-steel needle that you get in the cap.
You don’t get a perfect installation until the nipple on the seal goes inside the cap.
- Putting Back The Valve Cap
Once you have installed the new seal, you just have to go on reverse. You have to put the valve cap back in the valve shaft.
Instead of turning it counterclockwise, this time, you will be turning the cap clockwise to put it back in. Make sure to do it properly and keep it locked in place.
- Opening The Shutoff Valve
Next, you have to turn the handle of the shutoff valve counterclockwise to open it. This way, the water starts flowing inside the toilet tank once again.
- Refill your toilet tank
You have to finish off the process by refilling the toilet tank completely. After the tank is filled, you have to do a test flush.
This should tell you whether the problem is fixed or not. You can also try checking out for any leaks around the shutoff valve and the fill valve.
So, these were the steps you need to follow to fix the toilet fill valve cap spraying water. This mostly happens due to a leak that you can quickly fix by replacing the seal.
However, you can’t do this for just about any fill valve; it has to be a Fluidmaster fill valve. You may need to replace the whole valve for most other options rather than just the seal.
Now, you can also make sure you keep the fill valve through proper maintenance to avoid such problems. There are several things you can do. One of them is cleaning.
You have to maintain some rules for cleaning, such as cleaning any kinds of debris from the valve at least once a year.
With or without any issue, you should try following this. Try to avoid using bleach tablets and if you do, make sure to go through a routine inspection.
Following these simple things can help you avoid the problem for the most part. Now, watch the video explaining how to repair a Fluidmaster toilet fill valve.
FAQs: Fill Valve Leaking from Top
If your fill valve is spraying from the top, the most likely cause is an incorrectly set height or a loose connection with the fill tube. Make sure the valve is no more than 1” below the tank rim. Check that the tube is securely threaded onto the fill valve stem with no cracks.
If the water is leaking between the tank and bowl, there is likely an issue with the tank-to-bowl gasket. This rubber seal can become loose or warped over time, allowing water to drip down the exterior of the tank. Replacing this gasket should stop a toilet leak at the tank-bowl connection.
The main causes of a fill valve leak are a damaged flapper, sediment buildup preventing a good seal, incorrect fill height, or loose fill tube connection. Replacing the flapper, cleaning mineral deposits, and adjusting the fill valve height or tube fitting will typically fix a leaky fill valve.
Most Fluidmaster valves have a locking nut near the top of the valve body. Turn this nut counterclockwise to loosen and detach the top half of the valve so you can access the internal components and replace parts like the flapper. Make sure to realign any tabs before reattaching the top section.
Conclusion
To sum it up, fixing the Fluidmaster fill valve leaking from the top isn’t something that you have to lose your sleepover.
It’s pretty easy to fix; all you need to do is get the valve seal and replace it with the old one. This always fixes the issue.
Maintaining proper cleaning measures all the time works out the best. You don’t need to worry about too much work or repair issues this way at all.
Also, since you can’t repair most valves, it’s best to follow proper maintenance on them.
One thought on “Fluidmaster Fill Valve Leaking From Top: Reasons And What To Do?”
Leave a Reply
Recent Posts
I have fixed my share of running toilets over the years and you likely have too.This article shares my real experiences comparing Korky fill valve versus Fluidmaster so you can pick the right...
I have tested countless rolls in my kitchen over the years and you probably have too. This article shares my honest experiences comparing Brawny and Bounty paper towels so you can decide...
Hello Mr. Mitchell,
Flushing the valve and replacing the seal doesn’t always repair a leak at the top. I have replaced valves and seals before so I am familiar with the procedures. I had a leak at the top and flushed the valve several times and installed a new seal and while it slowed the leak it didn’t stop it completely. My best guess is because it is plastic it might have warped as I was able to slow the leak considerably but it still leaked for a little while even after the valve shut off the water. I don’t think it developed a hairline crack because flushing and replacing the seal did have some effect which would not have happened if there was a crack, but in the end I had to replace the valve.