As one of the most popular toilet fill valves on the market, the Fluidmaster 300 is found in millions of homes across the country. While generally reliable, issues can arise with the 300 that require troubleshooting and repairs.
This guide will walk through the most common problems experienced with the Fluidmaster 300 fill valve and provide solutions to get your toilet flushing like normal again.
Common Problems With Fluidmaster 300 Toilet Fill Valve and Solutions
Here are some of the most frequently occurring issues with the Fluidmaster 300 model and how to get them resolved:
1. Overflowing Tank
An overflowing tank is one of the most common 300 model issues and is generally caused by a problem with the fill valve mechanism itself. Some potential causes include:
- Incorrect float height – The float ballcock may be set too high, leading excess water to accumulate in the tank and overflow into the bowl. Adjust the float cup down to decrease water volume.
- Obstruction – Debris, flapper chain, or other objects can get caught under the float cup, preventing it from dropping fully to cut off the water. Inspect under the cup and remove any obstructions.
- Damaged float ball – Cracks or holes in the float ball will cause it to sink and malfunction. The entire fill valve will need replacement if float ball damage is found.
- Mineral buildup – Heavy calcium and mineral deposits around fill valve components can impede proper sealing and cause overflow. Cleaning off buildup may resolve this.
2. Intermittent Leaking
Sporadic leaks from around the fill valve seal are commonly caused by:
- Loose locknut – The locknut at the tank bottom needs tightened to fully compress the seal and prevent leakage. Hand tighten an additional 1⁄4 turn if slow drips persist.
- Warped or damaged tank shank – Extreme tank corrosion or cracks at the thread shank will distort the valve seal and cause leaks. Shank can’t be repaired so full replacement is needed.
- Worn flush valve seat – Extended use erodes the rubber seal surface, allowing water to drip into overflow tube. Seat and flapper kits can be installed to stop leaks.
3. Fill Valve Turns Off Too Soon
If the fill valve is shutting off before the tank is full, several fixes may get it to the proper level:
- Adjust float cup – Raise float cup back to original set level so water can accumulate sufficiently before valve closes.
- Clear debris under cup – Any trapped debris can impede float from moving up, leading it to shut off early. Clean under float and check for unrestricted movement.
- Remove excess chain slack – Too much slack in flapper chain can pull down float prematurely. Take out excess length keeping just enough to open flapper.
- Clean filter screen – Heavy debris buildup on filter screen creates back-pressure, closing valve too early. Clean screen of all debris.
4. Fill Valve Won’t Shut Off
Failure of the fill valve to stop water flow into the tank results in constant running and requires valve replacement. Some things that can lead to this:
- Float ball has filled with water – Float ball waterlogging is permanent and means components must be replaced. Valve will run continuously until repair.
- Stuck float cup – Gunk, chemical deposits or deformation can wedge float cup in upright position so water enters nonstop. Needs replacement.
- Broken control arm – Damaged float control arm won’t drop ballcock to cut off water. New valve will be required.
- Diaphragm failure – Hole, tear or separation in the diaphragm will prevent it from sealing the valve closed. Valve replacement necessary.
5. Toilet Won’t Flush
If no or weak flushing is happening, there may be issues with the diaphragm or toilet tank:
- Clogged ports – Debris blocking inlet valve ports won’t allow sufficient water flow. Remove buildup with pick, pipe cleaner or water pik.
- Stuck float ball – Ballcock sediments or deformation can wedge ball too high to flush. Freeing ball may resolve, else replace.
- Weak inlet water – Low household water pressure won’t fill tank fast enough to flush fully. Have home pressure checked and boosted.
- Obstructed tank tubes – Blocked openings in overflow tube, refill tube or tank bolts reduce flow during flush. Clean out all openings.
- Damaged diaphragm – Worn, rigid or obstructed diaphragm won’t fully open inlet valve so less water enters bowl. Replace diaphragm.
6. Fill Valve Has Slow Water Flow
A slow trickle of water when refilling the tank may indicate:
- Partially blocked supply line – Sediment, kinks, or crimps in the supply tube don’t allow full water flow. Inspect and replace rigid lines.
- Clogged inlet screen – Debris on the built-in inlet screen restricts water entering fill valve. Unscrew cap and rinse screen clean.
- Stuck float ball – Mineral deposits or corrosion can prevent float ball from rising with water, slowing fill rate. Replace float ball.
7. Fill Valve Doesn’t Close Fully
If water continuously dribbles into overflow tube, it means the valve isn’t sealing fully. Potential fixes:
- Misaligned refill tube – tubing knocking against fill valve parts prevents complete closure. Realign tube away from components.
- Warped float ball – Deformed or damaged float will not drop into valve seat correctly to close it. Replace float ball.
- Missing valve seat seal – Without the flush valve seat seal, water will leak through the unsealed closure. Install new valve seal.
8. Fill Valve Turns On Without Flushing
Fill valve opening randomly without the toilet being flushed can have these possible repairs:
- Obstructed chain/lever – Something trapped under flapper chain or flush lever is opening the valve. Inspect, remove obstruction.
- Misaligned float cup – Cup positioned too horizontally causes excess buoyancy opening valve early. Realign vertically.
- High water pressure – Excessive pressure through the supply line overpowers the shutoff valve. Install pressure regulator.
9. Low Water Pressure
Insufficient incoming water pressure can cause poor performance from the Fluidmaster 300. Without strong pressure, the flush and refill will be weak.
Check the supply pressure first with a gauge. Turn off the valve and attach the gauge to the supply line. Turn on the water and take a reading. Pressure should be at least 25 PSI for adequate valve function.
If pressure is lower than 25 PSI, the issue may be with your household plumbing. Clogged supply lines, undersized pipes, and restrictive valves can all limit pressure. Inspect the plumbing for problems and flush lines if necessary.
You may also need to adjust the Fluidmaster valve to compensate for low pressure. Try setting the float and diaphragm to be more responsive by lowering the float height. Just don’t lower it too much or the tank can overfill.
Installing a booster pump for your main supply line can also help overcome low pressure issues by increasing flow to fixtures. Just make sure the pump is properly sized for the plumbing system.
10. Mineral Build-up
Hard water is the arch-enemy of toilet valves. The minerals in hard water readily precipitate out forming crusty deposits on valve components. This is especially true in areas with very hard water.
Build-up is most likely to foul up the working surfaces of the diaphragm seal, float cup, and inlet valve seat. Interference from deposits hinders sealing and smooth movement of parts. Over time, operation degrades leading to leaks and improper shut-off.
Disassembling the valve and cleaning components is the solution here. Use a toothbrush and lime removal solution to scrub deposits from any mating surfaces and contacts. Avoid using abrasive cleaners that can damage parts.
For prevention, consider installing a water softener if you don’t already have one. Softening the water prevents mineral build-up by removing calcium and magnesium ions. Just remember to recharge and service the softener regularly.
You can also add a bit of regular white vinegar to the tank water to help dissolve existing deposits and scale. Don’t use vinegar with metal tank interiors though as it can corrode the surface.
11. Corroded/Damaged Float
The float undergoes constant motion every time the toilet is flushed and fills. All of this mechanical wear can lead to corrosion and damage over time.
Look closely at the float and lift arm for any cracks, pitting, or thinning of the metal. If the float has ruptured, water will enter causing it to sink. The lift arm can also become bent or kinked impeding smooth movement.
If minor corrosion is present, you may be able to salvage the components by sanding and painting. Use 100 grit sandpaper to rough up damaged areas and remove corrosion. Wipe clean and apply enamel spray paint. Allow to fully dry before reinstalling.
For a ruptured or badly corroded float, replacement is the best option. You can often just replace the float itself without the whole valve. Make sure to get an identical model for proper compatibility.
Preventing Future 300 Model Issues
While the Fluidmaster 300 is vulnerable to problems over time, there are things you can do to get the maximum service life out of the reliable fill valve:
- Periodically clean mineral deposits off fill valve components so they operate freely.
- Replace washers and seals as soon as any drips are noticed to prevent worse leakage.
- Keep inlet supply line clear of twists and kinks that can impede water flow.
- Remove tank obstructions like bloating in-tank toilet cleaners that can interfere with components.
- Refrain from jiggling or forcing the fill valve as this can distort seals and alignment.
- Turn off toilet supply valve if leaving home for extended periods to prevent accidental leakage.
When To Call A Plumber
While a number of 300 model fill valve problems can be repaired DIY, it’s advisable to call in a professional plumber when:
- The issue requires shutting off whole house water to resolve.
- Tank damage or distortion is causing recurrent problems reseating fill valve.
- Unique adaptations or non-standard installations are causing malfunctions.
- Severe corrosion, mineral deposits or sediment requires major disassembly to clean out.
- There are multiple leak points or the source can’t be isolated.
- Problems persist despite replacing all recommended parts and components.
The right plumbing expertise can troubleshoot trickier 300 issues, inspect for underlying causes, and ensure the fill valve gets seated and performs reliably after repairs. They have the skills to determine if toilet tank replacement is the only option remaining.
Frequently Asked Questions (FAQ)
The most widespread complaint with Fluidmaster valves is the tank water level overflowing due to malfunction of the float ballcock assembly. This is generally repairable by adjusting the float cup height or clearing any debris that may be obstructing it from shutting off.
The float cup height on the 300 model can be adjusted up or down to control the tank water capacity. To lower capacity, slide the clip on the valve shank down which drops the float cup. Raising clip back up will increase tank fill height. Adjust in increments, testing flush after each adjustment.
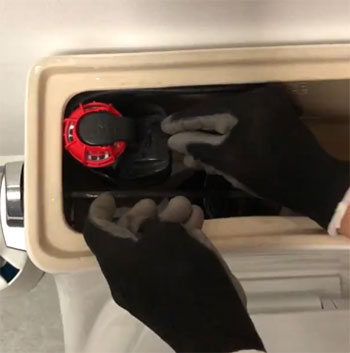
Replacing the cap assembly involves shutting off water supply, flushing tank, disconnecting/draining hoses, unscrewing cap nut, detaching float clips, removing old cap, installing new cap assembly, attaching float clip, reconnecting supply hoses, turning water back on, and adjusting float height.
A Fluidmaster that won’t close and shut off tank filling is most often caused by a damaged diaphragm, stuck float ball, or missing valve seat seal ring. This requires replacement of the diaphragm, float ball, and/or valve seal kit to get proper valve closure again.
A running Fluidmaster is usually caused by a bad diaphragm, float, or inlet valve. Try replacing individual parts like these. If uncertain on the issue, replacing the entire valve is recommended.
With proper maintenance, a Fluidmaster 300 valve should last around 10 years before needing full replacement. Regular cleaning and periodic seal/diaphragm replacement can significantly extend the lifespan beyond 10 years.
Final Thoughts
While the durable Fluidmaster 300 is susceptible to problems, most issues like overflow, leaks, weak flush, or not shutting off can be pinpointed through methodical diagnosis.
Following the troubleshooting steps outlined for each malfunction along with preventive care measures can restore normal operation and prolong the working life of the fill valve.
Calling in a professional for complex repairs is recommended to ensure the valve gets properly serviced. With some attention and care, the Fluidmaster 300 can continue providing many more years of reliable toilet function.
2 thoughts on “Dealing With Common Issues of Fluidmaster 300 Toilet Fill Valve”
Leave a Reply
Recent Posts
Olivier Midy Face Oil Reviews From My Experience: Is It Worth It?
You deserve skincare that nourishes and revitalizes your complexion with natural ingredients. Olivier Midy face oil stands out with its blend of botanical extracts and promise of glowing...
Round Lab Dokdo Cleanser Review From My Experience: Is It Worth It?
Selecting a safe, effective facial cleanser requires evaluating skin barrier compatibility, surfactant stability, and pH optimization.You need a dependable face wash that lifts impurities cleanly...
Thank you very much for your information…very helpful.
We had debris in the valve and that resolved the problem.
fill valve dribbles water how do I remove the top part to look further at the problem